This article will guide you on how to create an account on BlueMidx and we will help you set up the account step-by-step.
The first part is registration.
Registration
First, open the BMX portal: portal.bluemidx.com, then click the Register option.
You need to use a valid email for the registration and use a password.
And then you need to verify the email. (A verification link will be sent to your email, and you have to click the link that was sent to your email)
And your free trial account is complete. Then Log in to your account, select the Node depending on your preference, and assign a package to your free panel.
When the trial ends you can contact us to get a paid package assigned to your panel.
Creating a Profile
Navigate to the 'Data Access' section and select 'Profile.'
We have 8 steps to create a new profile.
1. Adding the brand name and description. Enter your brand name in the "Show Name" section, and in the description, simply describe your brand or app.
2. To add a logo, just paste the link of your logo. If you haven't done it yet, here's how: Upload your logo to any cloud storage, make it public, open the image in a new tab, and copy the link.
Note: We don't allow file uploads for security reasons.
3. QR code. Copy the link of your QR code and paste it in the "QR Code with contents" section. Then, for the QR code label, describe what the QR code represents.
Note: Convert your social messaging app links, such as Telegram, WhatsApp, and Skype, into QR codes. This enables customers to scan the QR code, making it easier for them to reach out to you in case of any issues.
4. Loading the screen. To add a loading screen, just paste the link of your logo. If you haven't done it yet, here's how: Upload your logo to any cloud storage, make it public, open the image in a new tab, and copy the link.
Note: We don't allow file uploads for security reasons.
5. Main Screen Background. Customize the main screen background to match your logo. You can select from the available themes or upload your own background image by pasting the link from your cloud storage.
6. Live TV Theme. Customize the live TV theme with available colors to match your branding.
7. Connectors. To access their content, registering your connector with the respective service provider is necessary.
Note: Each connector provides different content
8. Add-ons let you add more content that your connector might not have. Your connector can also create add-ons. If you're happy with what you have, you can skip this part and come back to it later.
By following these steps diligently, you can customize your profile to align perfectly with your brand identity and user preferences. If you encounter any questions or require further assistance along the way, our support team is here to provide guidance and support. Embrace the flexibility and versatility of BlueMidX as you begin enhancing your digital presence and engagement.
BMX Securities
BMX offers you various types of deep security such as encryption and stealth protection, we strongly recommend to configure your NXT servers from BMX Settings page properly first and then enable a security option through BMX. The configuration of servers and bmx settings page is crucial for any security options to work and we recommend having one of our Customer support agent to guide you through the process online.
How to Add Connectors
The connector is a component that allows you to stream channels from a service provider. To access their content, registering your connector with the respective service provider is necessary.
Sample Chart of Connector:
Before adding a new Connector to your BMX profile, you need to make some changes to your NXT panel, if
Steps for adding a New Connector
To create a new Connector, the main things you need are Platform Token and Private Keys, which you can get from the user/reseller section on your NXT panel.
To get the Platform Token and Private Keys, you need a reseller/admin account from your NXT which will include Packages information as well.
We assume you already have certain packages and crediting systems assigned to your Reseller/User account, in that case, you can just obtain the Platform Token and PV keys by clicking on the (BMX) button beside your user list.
If in any case you are a new NXT user or you want to separate the reseller/user account to be associated with BMX. You might want to start fresh by creating Bouquets > Packages including Crediting System > Assignment.
Skip this part if you are using your existing User/Reseller account from NXT.
Creating a Bouquet
1. Go to the Bouquets section on your NXT panel. Click on Create Bouquet.
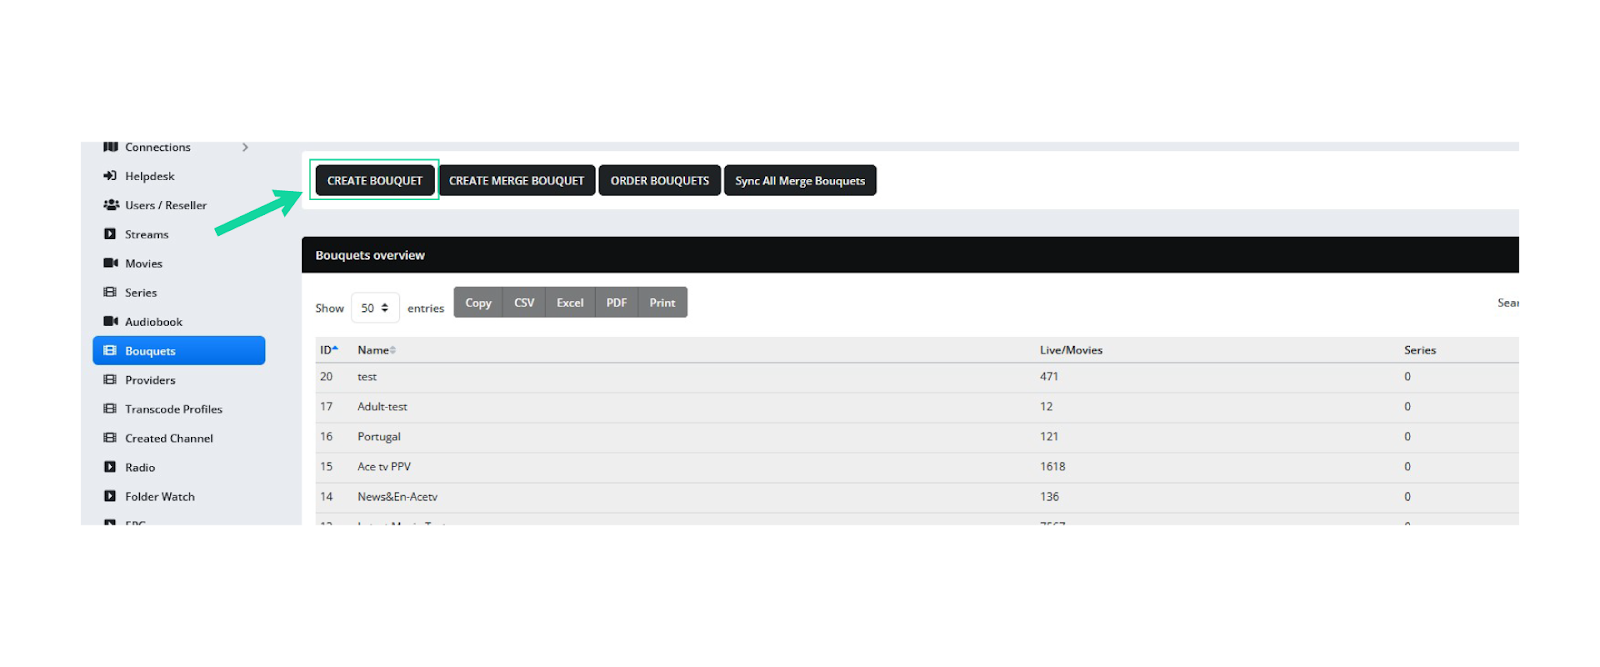
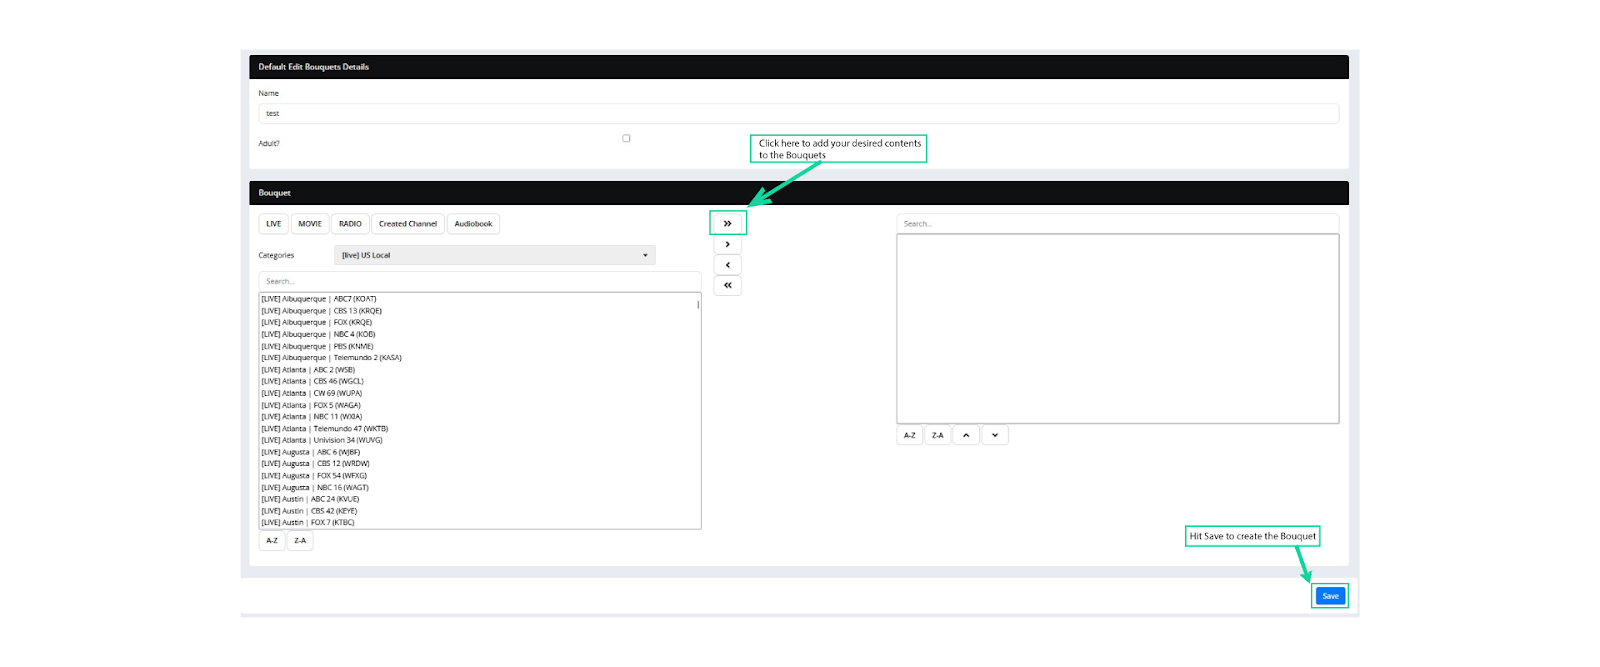
2. After that you need to select the contents that you want on this new Bouquet. Simply select the content that you want, for example, we are adding Live TV content. So click on LIVE and select the Category, then pass all the contents from left to right by clicking the double arrow (>>) option. Then hit save.
Note: If you want to create a series Bouquet, then after creating a Bouquet, don’t add any content, just go to the main page of the Bouquets section and Select the Edit series button from the Action menu at the right.
Now that we created a Bouquet, let’s proceed to Packages.
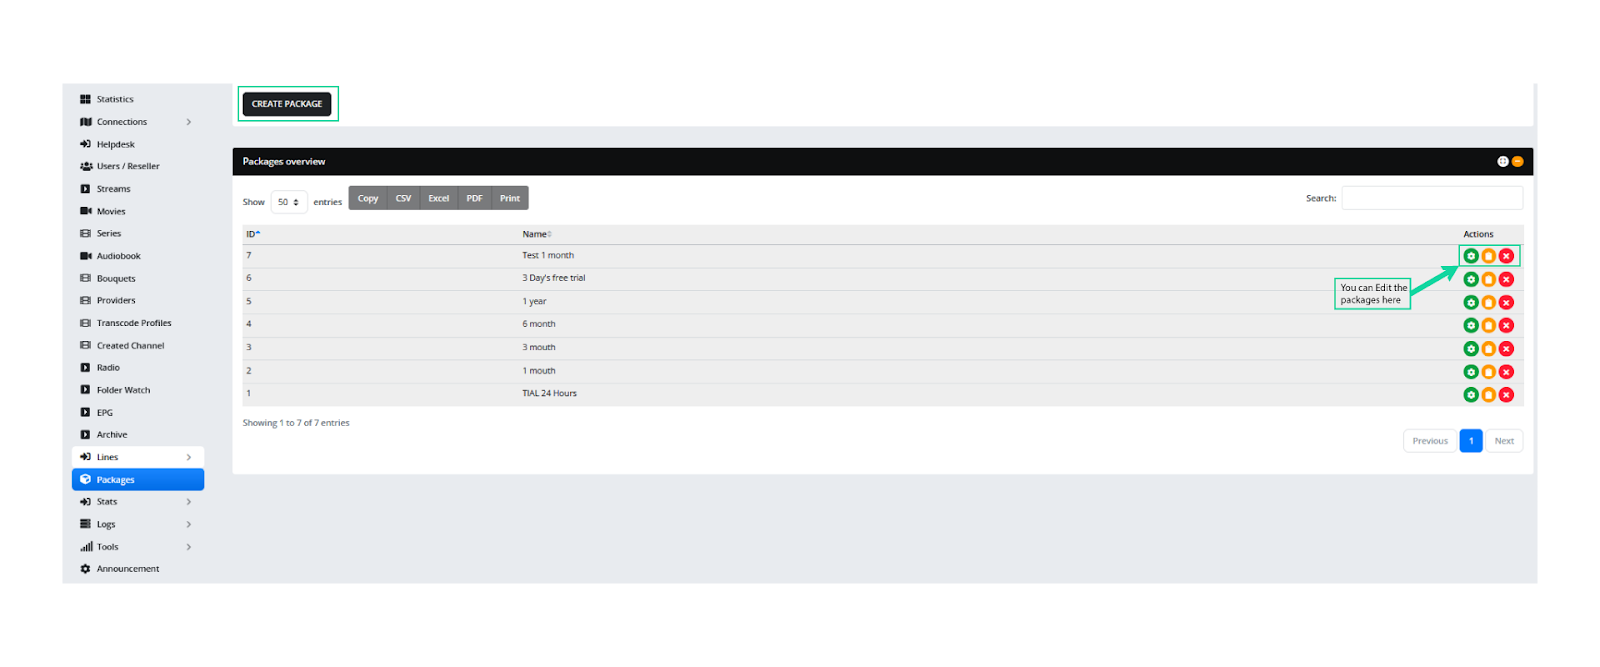
Create a Package
1. Go to the Packages section and click on Create Package.
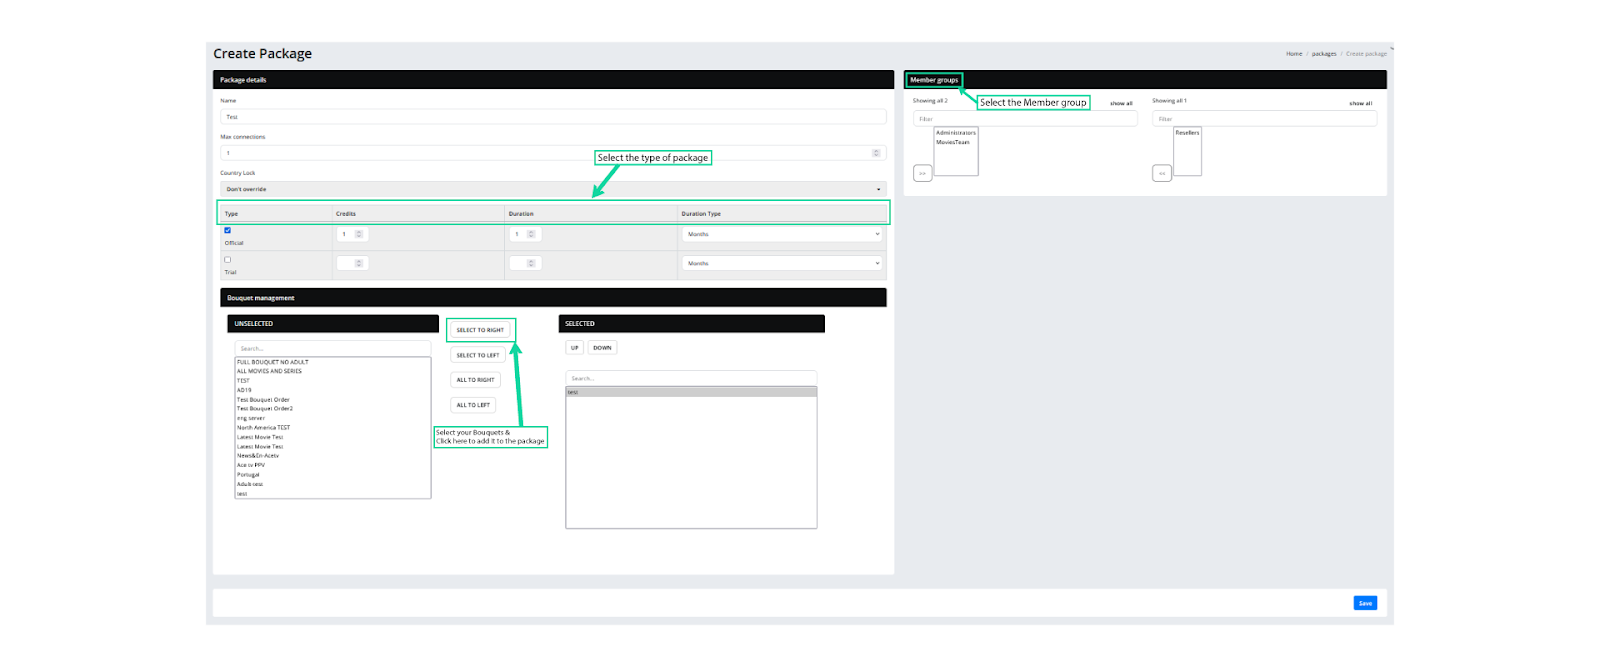
2. Enter a name then select the type of package, for example, we choose the package for 1-month official packages. You need to select how many credits will cost for this package as well. And lastly, select your Bouquets and click on Select to Right. After that, you need to choose the Member groups. Then hit save and your package is good to use.
After creating the package, it’s time to create a new User/Reseller.
Create User/Reseller
1. Go to the User/Reseller section and click on Create User.
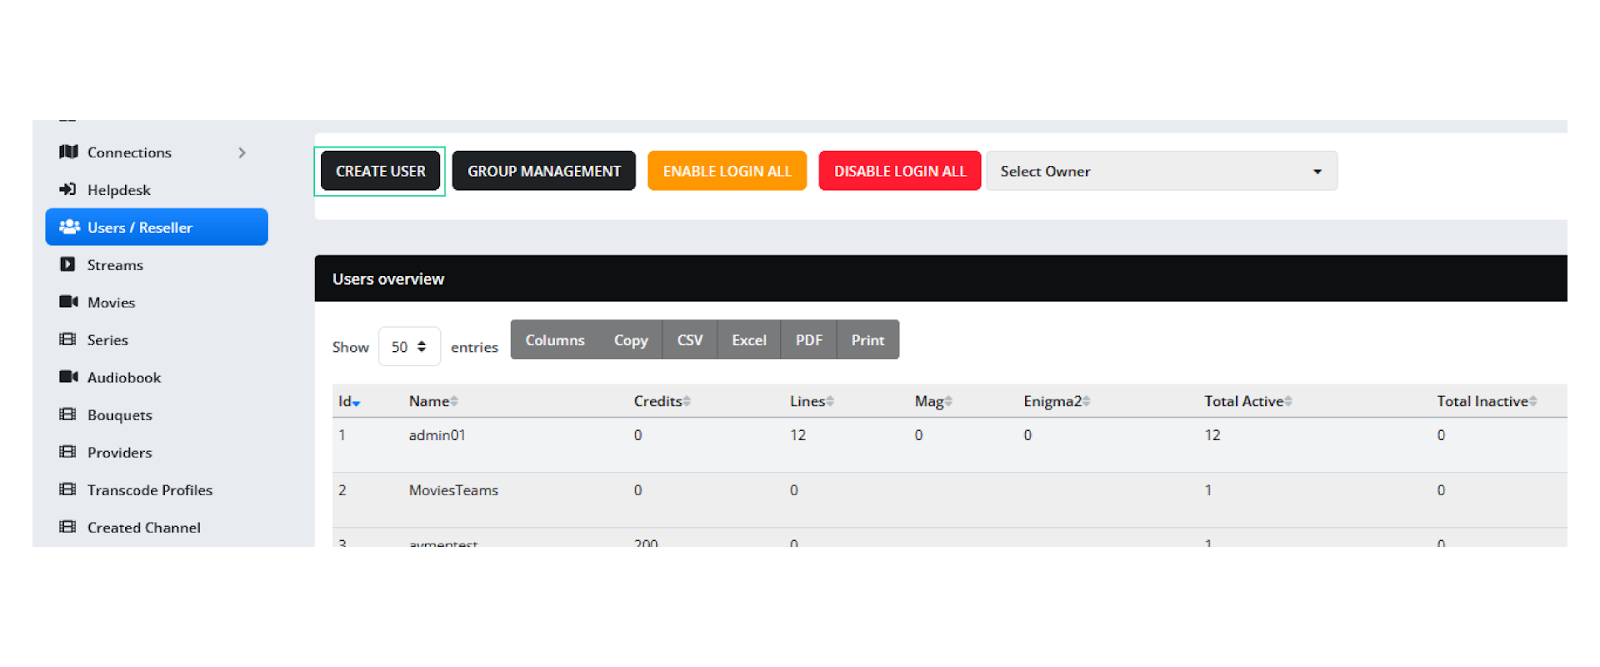
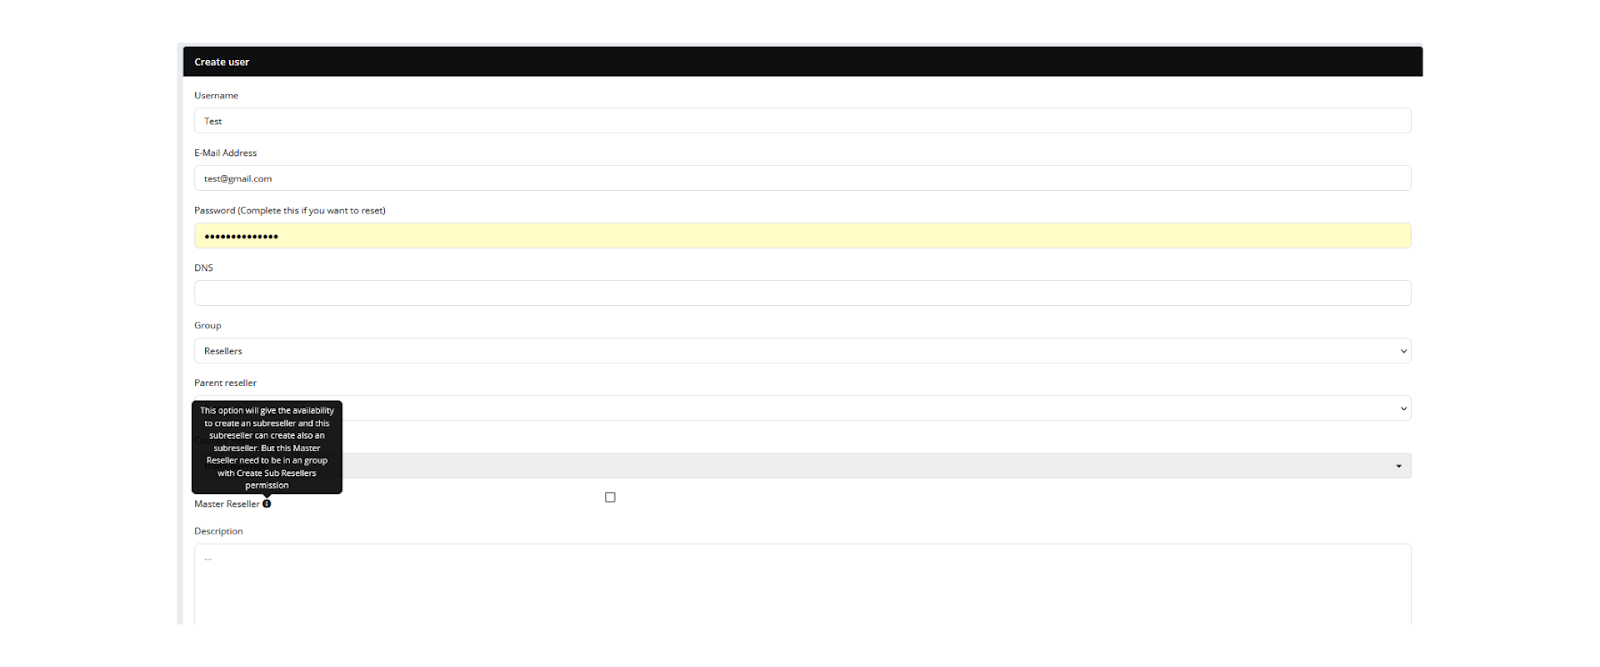
2. Enter your Username and password, email, and DNS (You can get the DNS from the Server Manager > Servers, usually the Main’s DNS is your desired DNS), then select the type of this user, for example, we are creating a Reseller type user. If it’s a Master Reseller, then check the Master Reseller box. (This option will give the availability to create a subreseller and this subreseller can create also a subreseller. But this Master Reseller needs to be in a group with Create Sub Reseller permission). And hit Save from the bottom.
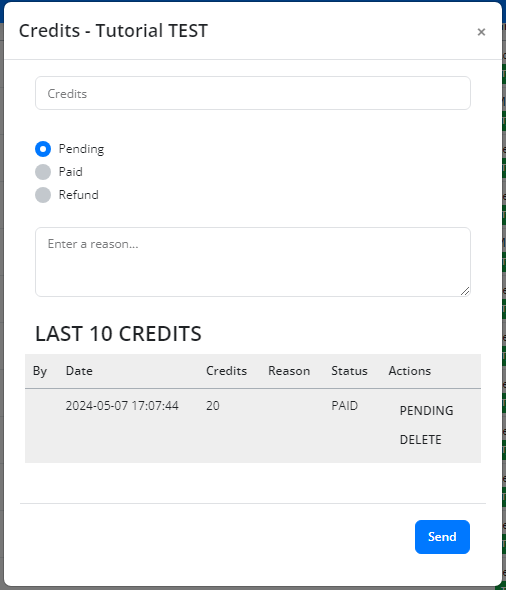
3. Now that the User is created, you need to give this new user credits and Packages.
First, from the Action menu at the right, click on Credits, and this page will pop up. Enter the amount of credits you want this user to have and then hit save.
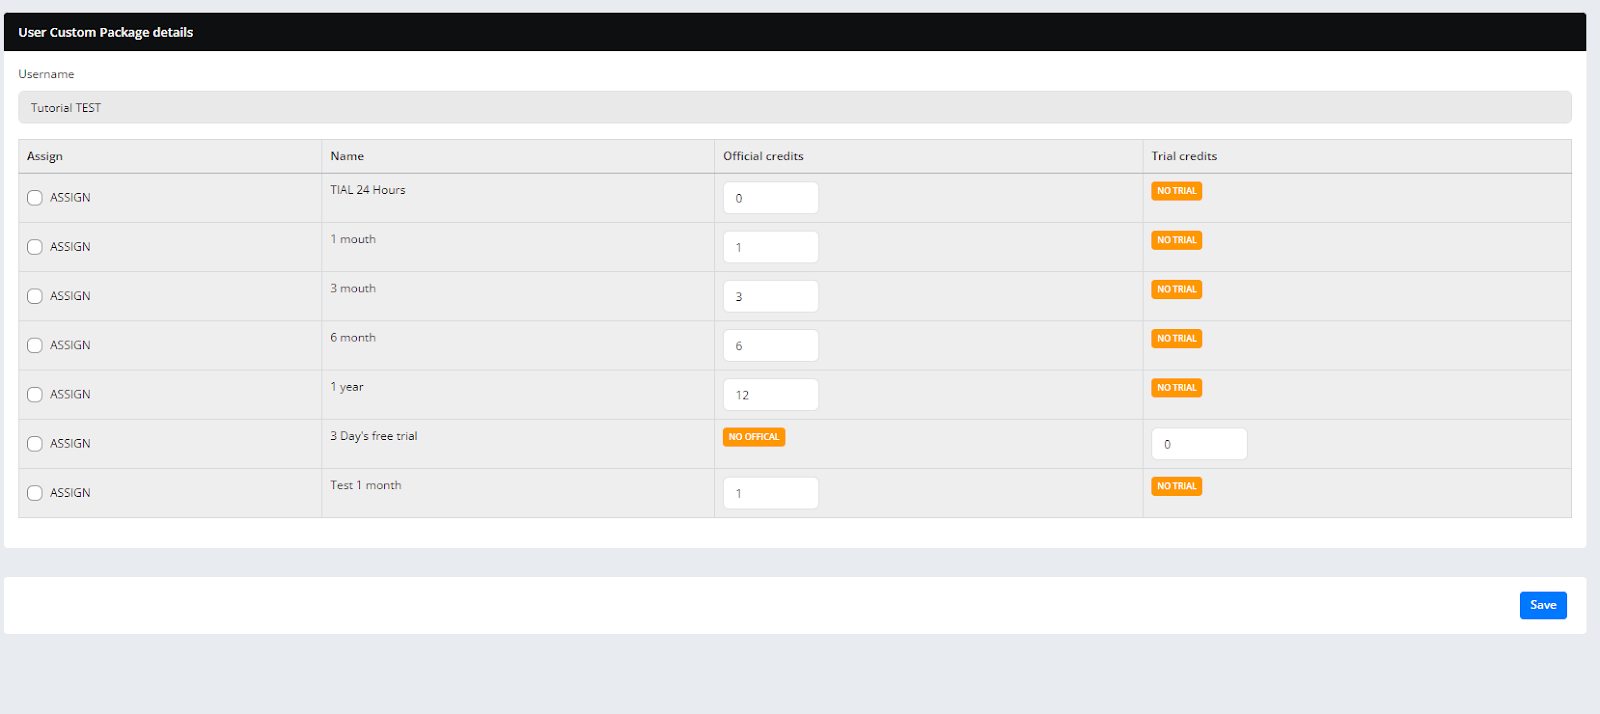
4. Again from the action menu click on packages and select your desired package for this user and click save.
After that, your work on NXT is almost done. Now you only need two things the Platform Token and BMX Private keys. To get these, you need to check the BMX Enable box from the settings.
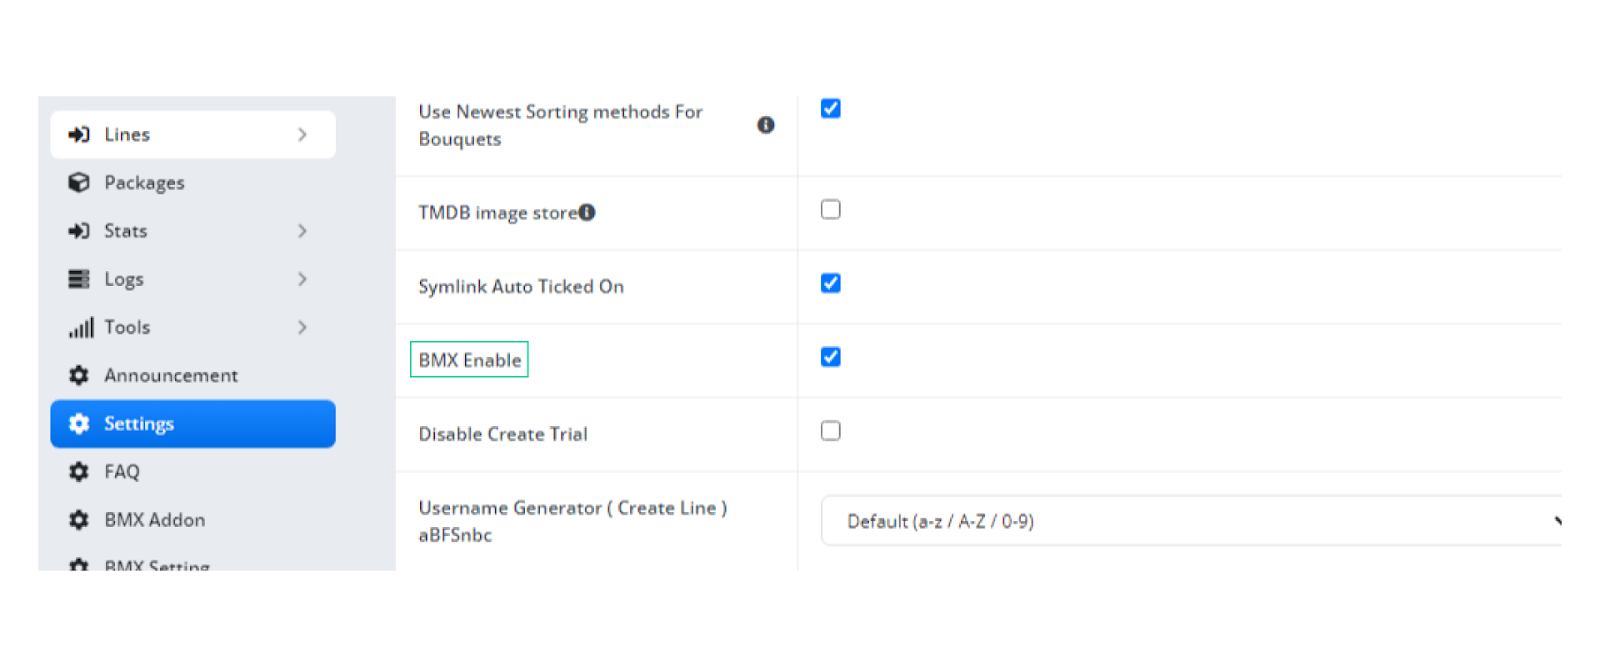
After doing this, go to the User/Reseller section again and click on the BMX button from the Action menu to retrieve the Platform Token and both Private Keys. Make sure there is no space in between while copying the Platform Token and Keys.
Now that you have the Token and Keys your work on the NXT panel is complete. You will need the Token and Keys for adding connectors on the BMX panel.
Creating Connection on the BMX
1. On the BlueMidX dashboard, navigate to "Connectors" under Media Inputs.
2. Click on "Create new Connector."
3. Enter the required information (Name, Platform Token, Private Keys, and Description).
Note: The token and private key can be received from the provider owner.
4. After creating the connector, you can now go to your profile tab and proceed to add it to your chosen profile.
Note: If you have multiple connectors, then you can switch between both of your connectors to your desired profile.
Connector’s actions:
Here are the details and actions you can use for Connectors, and please ensure you choose the
correct connector before updating or deleting it.
Edit: If you want to configure your connector's setup.
Check Connection: To verify the real-time connection status.
Fetch Provider Configurations: To obtain the latest configuration details from the service
provider's system.
Delete: If you no longer want to use that connector's service.
Connector’s details:
Name: Name of your connector or service provider.
Credits: Count of available credits from your provider.
Credits Updated: Showing the date of the most recent credit usage.
Provider Status: Status of the connection to your connector provided by the service provider.
Once the Connector is added, now let's create an activation code.
Create Activation code
The active codes are like voucher codes or prepaid codes that will let your end users activate their app with your desired plan very easily.
Once you have the connector added to a profile it will fetch your credits and packages information. Thus it will let you generate free trial or paid active codes.
1. To create activation codes, simply look on the left menu bar of your BlueMidX dashboard.
2. To generate active codes, click on the Create new Active Code option.
First, select your profile, then select the package, select the number of codes you want to generate then hit Create.
Create Trial Code
To create a free trial code, just toggle the trial option ON, and you will be able to create trial codes.
To use these codes you need to install the TrezorX app.
How to Install the TrezorX app
To install the TrezorX app - https://tinyurl.com/trezorx enter this link on the downloader app using an Android box such as Amazon FireStick, NVidia Shield, or Google TV.
For the Android mobile app - https://tinyurl.com/tzxmobile enter this link on your phone's browser.
And from the Activation code section, you will be able to monitor the circumstances of the codes. You can see the code creation date, expiration date, from which profile the code is generated, package name, code status, and DSN.
And from the Action button, you can migrate or activate code and delete code.
To Activate or Migrate any activation code, click on the Activate or Migrate from the action button then just enter the DSN(Device Serial Number) and click on the Activate or Migrate button.
Search Option
On the search bar, you can search with codes, profiles, DSN, and descriptions.
Adding an Add-on
To add an Add-on to your BMX panel, you need a BMX Add-on on your NXT panel.
To create a BMX Addon you also need Bouquets, and while creating an add-on, you need to make sure the Bouquets only have one specific type of content, for example, only Live TV Bouquets or only Movies or Series Bouquets.
Create a BMX Add-On
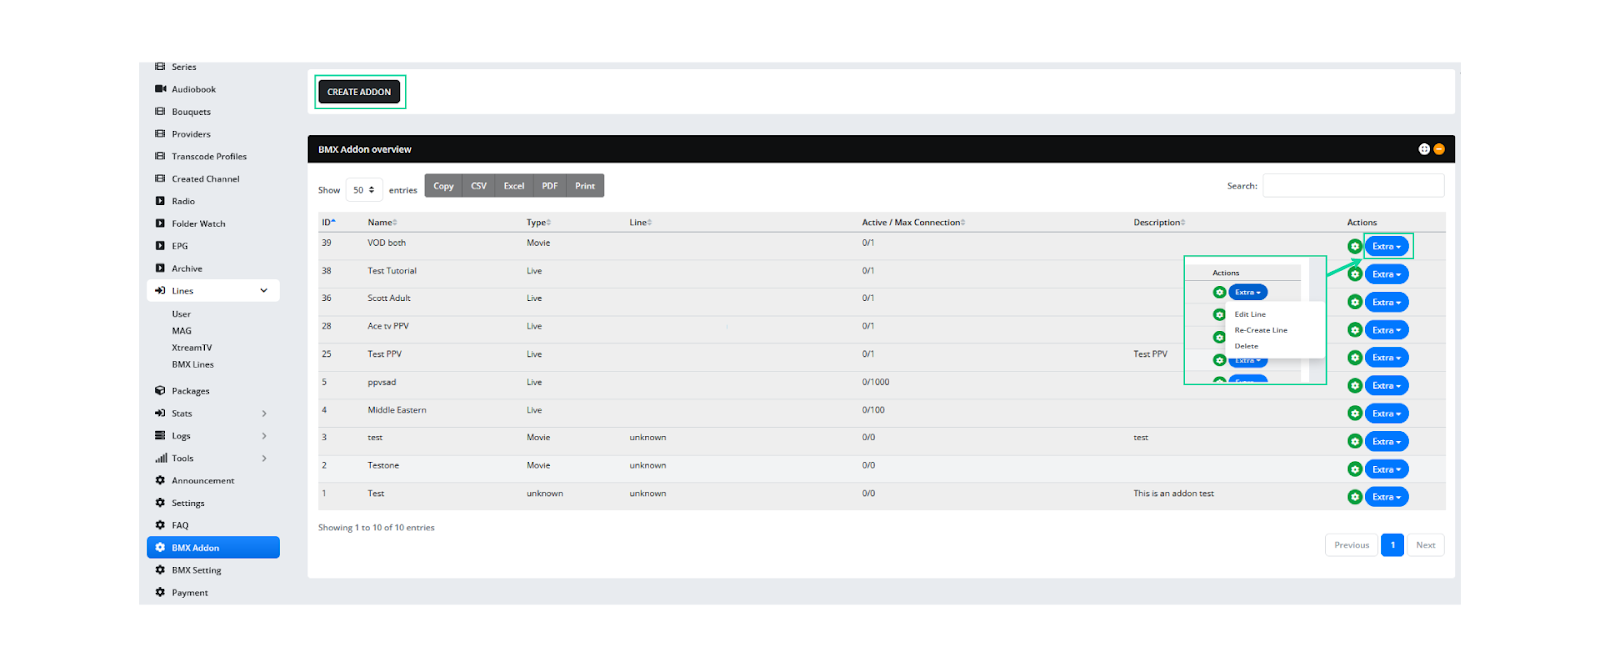
1. Go to the BMX Addon section on your NXT Panel. Then click on Create Addon.
2. Now select the type of addon. If it’s a Live Add-on, choose Live. Select the name of your Add-on, enter the DNS, Max connection is usually 1 because an addon can be used to one particular BMX profile, and lastly, select the expiration date and hit Save and Create User.
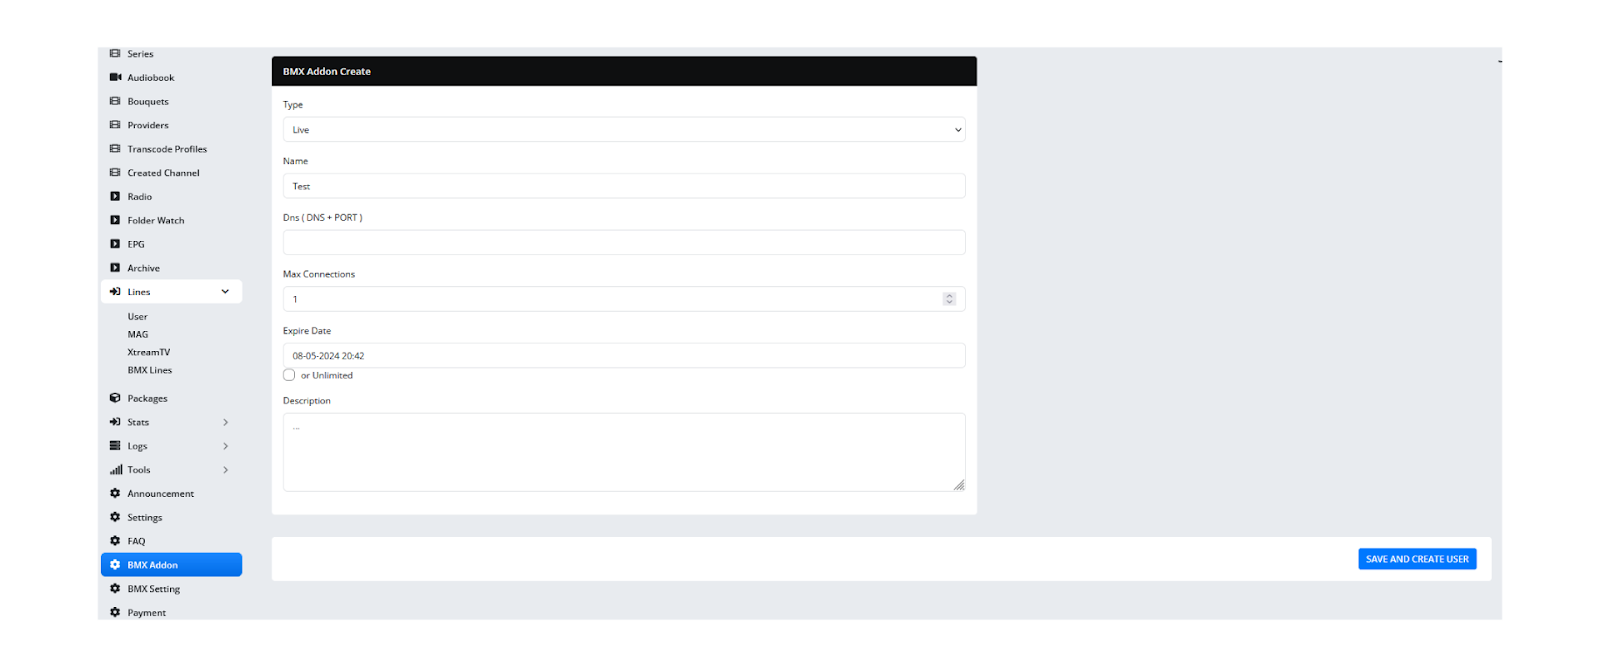
3. After clicking on Save and Create User, a new page will pop up, from there you can get Token 1 and Token 2, copy and save them somewhere as you will need them later in BMX. Otherwise, you can always open an Edit addon page and see the tokens. In the case of a Reseller Account, you will not have access to this page. For a reseller, The tokens can be achieved from the Provider.
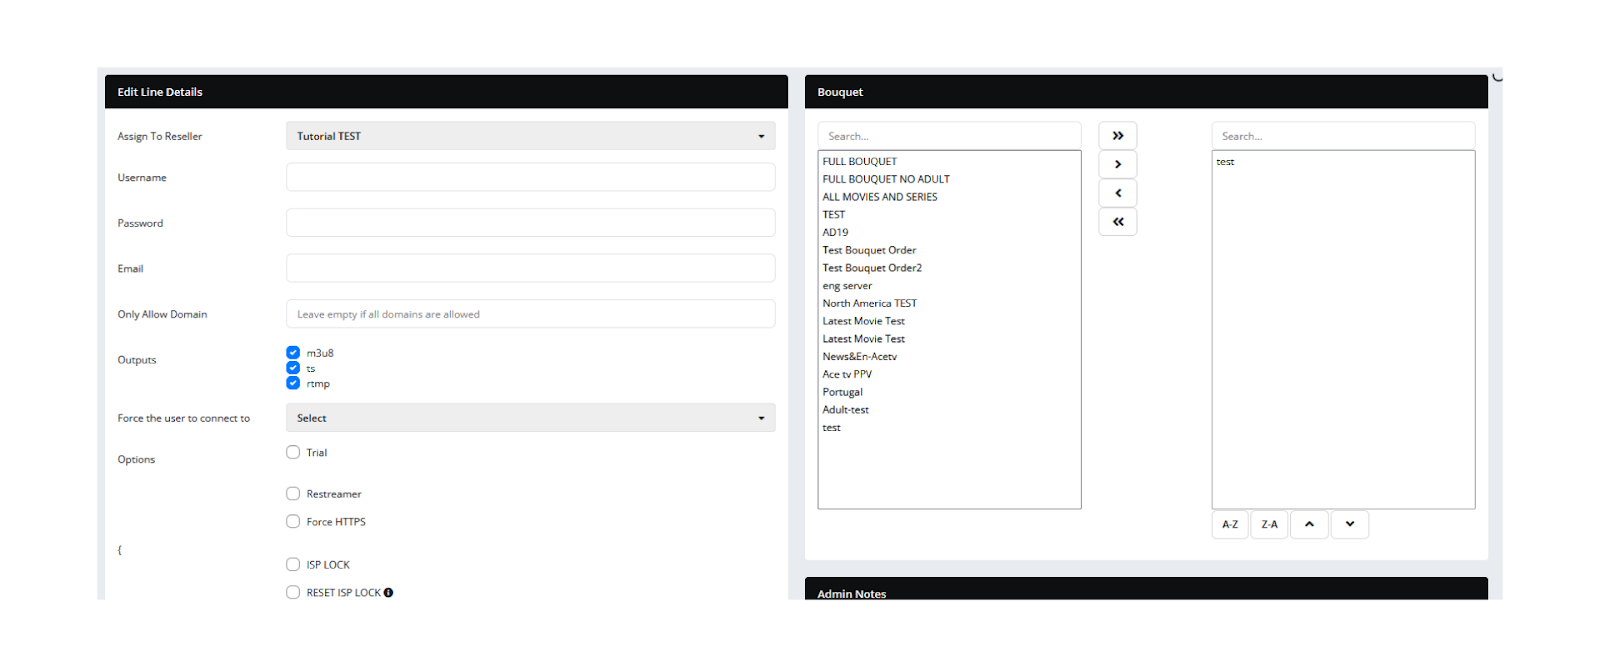
4. Return to the main BMX Addon page and select Extra > Edit Line from the Action menu for the addon you just created. Now just select the Reseller that you want to assign this add-on, and choose your desired bouquets. Then hit Save at the bottom.
Now that you have created an Add-on on your NXT panel, you can just take the tokens for this add-on and use them while creating an Add-on on your BMX account.
Adding Add-on on BMX
1. On the BlueMidX dashboard, under the Media Inputs you can see the "Addons" section.
2. To create a new Add-on, click on "Create."
3. Enter the Name, and select your Platform, after choosing your Platform, you need to add Tokens or Username and Password (based on the type of XC you use. And you can get these tokens or Username and password from your provider), then paste your Add-on's Icon URL, Description and simply click Save to finish creating the Add-on.
Note: If your Add-on is an Adult Add-on, then make sure to ✔ the Adult check box. (Any adult Add-ons will be protected by Parental PIN on the app, the default PIN on the app is - 0000, and you can always change the PIN from the app settings at any point.)
4. After creating the Add-on, you can go to your profile tab and add it to your chosen profile.
Go to the Profile section, then Click on Edit for your desired Profile. Then scroll down and locate the Add-on option at the bottom, and you will be able to see your created Add-on. Lastly, Click Save to successfully add the Add-on to you profile.
Add-on Details
Name: Name of your Add-On’s service provider.
Type: Live, Movies, Series or Radio.
Platform: Displaying the platform used by Add-On's service provider.
Connections: Indicates the available connections.
Actions: Allows you to Edit your Add-ons, Check the Add-on's connection, or option to delete the Add-on (You can only delete an Add-on, if it's not added to any of your profiles).